Tag Archives: Create

A picture with garbled characters and the word password in the middle

How to generate a random password with T-SQL

The following script will generate a random 10 character password that meets the complexity requirement for Microsoft Windows. To generate a password just run the script in a new SQL Server Management Studio window. The logic can also be easily turned into a function.

The option of symbol characters is limited to what’s shown below as dealing with quotes and obscure characters in a password is often more trouble than it is worth. The password generated however should still be very secure as it will be 10 characters long with a guaranteed number, lowercase letter, uppercase letter and a symbol.

!
#
$
%
&
(
)
*
+

/*Declare Variables*/
DECLARE @i INT;
DECLARE @Pw VARCHAR(MAX);
DECLARE @Numbers TABLE (Characters CHAR(1));
DECLARE @LowerCase TABLE (Characters CHAR(1));
DECLARE @UpperCase TABLE (Characters CHAR(1));
DECLARE @Symbols TABLE (Characters CHAR(1));
DECLARE @BaseCharacters TABLE (Characters CHAR(1));
DECLARE @GuaranteedCharacters TABLE (Characters CHAR(1));
DECLARE @PwCharacters TABLE (Characters CHAR(1));

/*Generate Numbers*/
SET @i = 0;

WHILE @i <= 9
BEGIN
	INSERT INTO @Numbers
	SELECT @i

	SET @i = @i + 1
END;

/*Generate Lowercase Letters*/
SET @i = 97;

WHILE @i <= 122
BEGIN
	INSERT INTO @LowerCase
	SELECT CHAR(@i)

	SET @i = @i + 1
END;

/*Generate Uppercase Letters*/
SET @i = 65;

WHILE @i <= 90
BEGIN
	INSERT INTO @UpperCase
	SELECT CHAR(@i)

	SET @i = @i + 1
END;

/*Generate Symbols*/
SET @i = 33;

WHILE @i <= 43
BEGIN
	IF (
			@i = 34
			OR @i = 39
			)
	BEGIN
		SET @i = @i + 1
	END

	INSERT INTO @Symbols
	SELECT CHAR(@i)

	SET @i = @i + 1
END;

/*
Randomly Select A Number, Lowercase Letter,
Uppercase Letter And A Symbol So Four Character Types
Are Guaranteed To Be Present Somewhere In The Password
*/
INSERT INTO @GuaranteedCharacters (Characters)
SELECT TOP 1 Characters
FROM @Numbers
ORDER BY NEWID();

INSERT INTO @GuaranteedCharacters (Characters)
SELECT TOP 1 Characters
FROM @LowerCase
ORDER BY NEWID();

INSERT INTO @GuaranteedCharacters (Characters)
SELECT TOP 1 Characters
FROM @UpperCase
ORDER BY NEWID();

INSERT INTO @GuaranteedCharacters (Characters)
SELECT TOP 1 Characters
FROM @Symbols
ORDER BY NEWID();

/*
Randomly Select Another 6 Characters
*/
INSERT INTO @BaseCharacters
SELECT TOP 6 Characters
FROM (
	SELECT Characters
	FROM @Numbers
	
	UNION ALL
	
	SELECT Characters
	FROM @LowerCase
	
	UNION ALL
	
	SELECT Characters
	FROM @UpperCase
	
	UNION ALL
	
	SELECT Characters
	FROM @Symbols
	) AS Characters
ORDER BY NEWID()

/*Generate A 10 Character Password*/
INSERT INTO @PwCharacters (Characters)
SELECT Characters
FROM (
	SELECT Characters
	FROM @BaseCharacters
	
	UNION ALL
	
	SELECT Characters
	FROM @GuaranteedCharacters
	) AS Characters
ORDER BY NEWID()

/*Save The Password To A String*/
SELECT @Pw = COALESCE(@Pw + Characters, Characters)
FROM @PwCharacters

SELECT @Pw AS PW;


If you found this post helpful please like, comment and share.

How to tell if you are a member of a SQL Server group or create a list of group members using T-SQL

The following scripts will help you determine if you are a member of a group or role or create a list of group members in SQL Server without having to use SQL Server Management Studio. This is a particularly handy script in determining who might have access to the server through Active Directory groups.

/*
The code below indicates whether the current user is a member 
of the specified Microsoft Windows group or SQL Server database role.
A result of 1 = yes
,0 = no
,null = the group or role queried is not valid.
*/

SELECT IS_MEMBER('group or role')

/* 
Example. 
*/

SELECT IS_MEMBER('db_owner')

/*
The code below will create a list of all the logins that are members 
of a group. Don't forget to include domain, e.g. admin\user
*/

EXEC master..xp_logininfo 
@acctname = [group],
@option = 'members'


How to handle a Database creation request

If you are working as a DBA you may find that developers will ask you to create a database having given little thought to what the database will be used for or the impact the database could have to the resources or security of the hosting environment.

If you find yourself in that situation I would suggest you walk the requester through the questionnaire from the previous article “How to determine where a new database should be deployed“.

Once you have completed that process I would then suggest that an official request to deploy a new database be made using the DATABASE REQUEST FORM provided here link. If you have a change request process I would still suggest you use this form. Having a database specific request form covers more relevant and vital information.

This is a fairly high level request form with most of the technical details still to be defined by the DBA but it provides documentation of the request and states the requester’s initial expectations and requirements.

Following the database deployment if the actual footprint of the database does not match up with what was agreed the form will confirm if the requested resources were under specced or misleading.

The form is outlined as below.

DATABASE REQUEST FORM image

Some important points the form clarifies:

There’s a difference between requester and owner. If the database runs into any problems you don’t want to be contacting the temporary intern that requested it instead of say the department head.

The application the database supports. Most of the time the database name will have some tie-in to the application name but maybe it does not. For instance the database could be named something generic like Reporting which could be the back end for really anything.

The form asks the requester to prepare a profile for the database. I could have named this section “who is your daddy and what does he do?”. If the requester states they are looking for a OLAP reporting database but operationally it’s running as a OLTP transactional database, that could make a big difference in terms of the resources provided for the database and underlying hardware.

Possibly most importantly the form helps to establish the likely impact of the new database with the Resource Impact Estimation section. For example if a requester asks for 10 Gb of space and states they expect space usage to increase by 5 Gb a year but the disk has lost a terabyte in the first few months the form will clarify who got their numbers wrong.

The user and groups section will clarify who should have access to the database. Effectively everything related to data and data access should be okayed by a compliance officer to confirm everything is GDPR compliant. This form will assist the compliance officer in establishing that.

The Business continuity & Upkeep section is really the domain of the DBA but it helps to get requester input on these matters. For instance establishing maintenance windows.

If you have any additional questions you feel should be on the form please feel free to contact me and I’ll add them.

How to determine where a new database should be deployed

Below I’ve listed 22 questions to consider when deciding where a new SQL Server database should be deployed given the four main options of:

  1. Add Database to existing Instance
  2. Create separate Instance for Database
  3. Create separate VM for Instance and Database
  4. New physical machine needed

There’s no hard and fast rule for determining where a database should go however there are often a lot of limitations dictating your choices. I’ve started the list with a big limitation, money.

If you want to use the list like a score card I’ve prepared one called “New Database Hosting Environment Assessment Form”, I know not the snappiest of titles.

New Database Hosting Environment Assessment Form

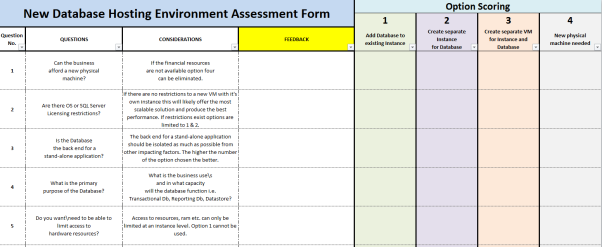
Use: I’d recommend stepping through the questions with the requester while gathering feedback. You can then fill in the option scoring with weighted figures or simply use the boxes to record notes. The main deliverable of the form is you will have some documentation that demonstrates the location for the database was assessed and the logic and reasoning for the location chosen has been recorded.

Of course consider adding additional questions relevant to your case to the form. If you think your additional questions would be relevant to everyone deploying a new database free to forward your questions on to me and I’ll include them in the form.

The form can be downloaded here link.

Question 1: Can the business afford a new physical machine?

Considerations: If the financial resources are not available option four
can be eliminated.

Question 2: Are there OS or SQL Server Licensing restrictions?

Considerations: If there are no restrictions to a new VM with it’s own instance this will likely offer the most scalable solution and produce the best performance. If restrictions exist options are limited to 1 & 2.

Question 3: Is the Database the back end for a stand-alone application?

Considerations: The back end for a stand-alone application should be isolated as much as possible from other impacting factors. The higher the number of the option chosen the better.

Question 4: What is the primary purpose of the Database?

Considerations: What is the business use\s and in what capacity will the database function i.e. Transactional Db, Reporting Db, Datastore?

Question 5: Do you want\need to be able to limit access to hardware resources?

Considerations: Access to resources, ram etc. can only be limited at an instance level. Option 1 cannot be used.

Question 6: Are there any SQL Server Service Pack dependencies?

Considerations: SQL Server can have different SPs on different instances but cannot have different SPs for different databases within an instance.

Question 7: What is the current excess capacity of the hardware?

Considerations: Can the Hardware handle the additional workload? If not either reduce resource consumption of resources on the hardware, add RAM and/or cores or choose option 4.

Question 8: Is there a VM capacity restraint on the hardware?

Considerations: Can the hardware actually host a new VM without a trade off in resources or a decrease in performance? If restrained option 3 cannot be used.

Question 9: What is the VM capacity?

Considerations: Is the OS already maxed out on resources? Can the VM handle the additional workload?

Question 10: Is there an expected increase in size and usage in the Database over time?

Considerations: If known and minimal option 1 can be used. If unknown or unlimited the higher the number of the option chosen the better.

Question 11: Is the resource usage of the new Database known?

Considerations: Benchmarking RAM, CPU and bandwidth usage should be carried out prior to installation.

Question 12: What are the disaster recovery requirements?

Considerations: Should the databases that share common dependencies be hosted on
the same server?

Question 13: What is the required operational up time? 24/7 etc.

Considerations: Does this operational run time tie in with the rest of the databases
on the instance, or the instances hosted on a VM or physical server?

Question 14: What are the Maintenance requirements?

Considerations: Will new index rebuilds etc. take a long time and effect the schedule of the instance overall?

Question 15: What are the Backup requirements?

Considerations: Will the backup schedule of the other databases be impacted
by the addition?

Question 16: Is the Database functionally similar or supporting databases currently on the instance?

Considerations: Does the new Database logically fit in with the database/s currently running on an instance?

Question 17: Have server security concerns been addressed?

Considerations: Will people with administrative access to the server have access to a Database and data they should not be able to see?

Question 18: Does hosting particular databases together compound the potential
damage If an unauthorised person was to gain access to the server?

Considerations: Will an unauthorised person have access to data that represents a major security breach if the data is combined from different databases?

Question 19: Does a vendor have control over the instance or server?

Considerations: Will putting a Database on a particular instance leave you at the mercy of a vendor?

Question 20: Will stacking instances make tracking down performance issues across
the VM difficult?

Considerations: Will this create a server level noisy neighbour problem?

Question 21: Will packing databases too densely make tracking down performance issues across the Instance difficult?

Considerations: Will this create an instance level noisy neighbour problem?

Question 22: Will moving the Database to be hosted somewhere else in the
future be possible?

Considerations: Does this decision need to be gotten right the first time?

How to create a csv file with C#

This is a simple tutorial on creating csv files using C# that you will be able to edit and expand on to fit your own needs.

First you’ll need to create a new Visual Studio C# console application, to do so follow these steps:

To create and run a console application

  1. Start Visual Studio.

  2. On the menu bar, choose FileNewProject.
  3. Expand Installed, expand Templates, expand Visual C#, and then choose Console Application.
  4. In the Name box, specify a name for your project, and then choose the OK button.
  5. If Program.cs isn’t open in the Code Editor, open the shortcut menu for Program.cs in Solution Explorer, and then choose View Code.
  6. Replace the contents of Program.cs with the following code.

using System;
using System.Collections.Generic;
using System.Linq;
using System.Text;
using System.Threading.Tasks;
using System.IO;

namespace CreateCsv
{
    class Program
    {
        static void Main()
        {
            // Set the path and filename variable "path", filename being MyTest.csv in this example.
            // Change SomeGuy for your username.
            string path = @"C:\Users\SomeGuy\Desktop\MyTest.csv";

            // Set the variable "delimiter" to ", ".
            string delimiter = ", ";

            // This text is added only once to the file.
            if (!File.Exists(path))
            {
                // Create a file to write to.
                string createText = "Column 1 Name" + delimiter + "Column 2 Name" + delimiter + "Column 3 Name" + delimiter + Environment.NewLine;
                File.WriteAllText(path, createText);
            }

            // This text is always added, making the file longer over time
            // if it is not deleted.
            string appendText = "This is text for Column 1" + delimiter + "This is text for Column 2" + delimiter + "This is text for Column 3" + delimiter + Environment.NewLine;
            File.AppendAllText(path, appendText);

            // Open the file to read from.
            string readText = File.ReadAllText(path);
            Console.WriteLine(readText);
        }
    }
}


Now when you start the program it should create a csv file called MyTest.csv in the location you specified. The contents of the file should be 3 named columns with text in the first 3 rows.

If you would like to know how to create a console application in Visual Studio that reads a csv file into a list variable see this tutorial link. The tutorial will also show you how to clean strings with regex and will introduce you to functionality that will allow you to search a list for matching strings.

If you would like to know how to create a console application in Visual Studio that won’t open a command window when it runs see this tutorial link.

An icon symbolising data moving to different tables via ssis

How to use Temp tables in an SSIS package

If you have been using a query which utilizes temp tables but now you want that query to run as an SSIS package it’s going to need a bit of reworking.

Just adding the query as an Execute SQL Task in Visual Studio won’t work unfortunately if you are using, for example, SELECT * INTO to create the temp tables.

The First step to reworking the query will be to dedicate an Execute SQL Task to creating the temp tables your query uses, defining columns and data types etc. and then populating those tables with INSERT INTO rather than SELECT INTO.

For the following we will assume only one output temp table is required for the process which will be as follows:

  • A temp table to store data will be created.
  • A query will be used to populate this table.
  • This populated temp table will then become the source from which data will be pulled.

STEP 1.

In SSMS connect to what will be the source server and enter the statement to create the required temp table as a global temp table i.e. prefixing the table name with ##. Creating the table as a global temp table at this stage avoids errors when configuring the OLE DB Source in Visual Studio as it allows the table to be visible to the SSIS package.

STEP 2.

In Visual Studios drag a new Execute SQL Task into the control flow and name it, Create Temp Table.

Image showing Execute SQL Task Create Temp Table

Double click on the task to bring up the Execute SQL Task Editor window.

Image showing the Execute SQL Task Editor Window

Step through the process for creating a connection in the connection option and enter the following for the SQL statement option replacing yourTempTable with the name of your temp table.

IF OBJECT_ID('tempdb..##yourTempTable') IS NOT NULL
   DROP TABLE ##yourTempTable


Below this statement enter the same statement to create the global temp table as you used in SSMS.

STEP 3.

Next in the Create Temp Tables Properties, the window to the bottom right, for the section Execution under the option DelayValidation set the value to True. In STEP 1 the temp table is created and visible to Visual Studio, but when the SSIS package is run in the future the table won’t be there to be validated prior to the package running. Without setting this property to true the package would seek to confirm the existence of the temp table and would error when it determined the temp table does not exist stopping the package from running.

Image of Create Temp Table Task Properties showing DelayingValidation option set to True

STEP 4.

Next at the bottom of the design view window in Visual Studio the current source connection should be displayed. Left click on the source connection and the properties window should change focus to connection properties. Set the RetainSameConnection option to True, this allows the global temp table to remain visible to SSIS package during the package’s execution by maintaining the session.

Image showing the Connection Properties window with the RetainSameConnection option set to true

STEP 5.

Drag a Data Flow Task onto the Control Flow workspace and rename it Query and drag the precedence constraint between the Create Temp Table and Query.

Image showing OLE DB Source creation process

Double left click on the Query Task.

From Other Sources drag an OLE DB Source into the Data Flow workspace.

Double left click on the OLE DB Source and set the OLE DB Connection Manager to your source server and Data Access Mode to SQL Command.

Image of the OLE DB Source Editor Window

Enter your SQL Command in the box provided e.g.

SELECT * FROM ##yourTempTable


Hit OK on the OLE DB Source.

STEP 6.

Set up the destination as you would with any other typical SSIS package.

From Other Destinations drag an OLE DB Destination into the Data Flow workspace.

Then drag the precedence constraint between OLE DB Source to the OLE DB Destination.

Double left click on the OLE DB Destination and choose your destination and set “Table or View – fast load” from the data access mode dropdown. For the “Name of table or view option” enter your intended destination.

Hit OK on the OLE DB Destination.

Finally I would suggest adding another task that will drop the temp tables at the end of the package. For example, DROP TABLE ##yourTempTable.

Conclusion.

At this point you should now be able to run the package successfully and make your own adaptions to this process to fit your future needs.